Database development protocol can be challenging to carry out due to the many objects that are actively being created and altered. The best way to stay organized is by using labels, revisions, and live settings.
Labels, Revisions, and Live Settings Defined
Before delving into the particulars of the process, it’s important that we define our terms. Without a shared frame of reference and shared vernacular, nuances in terminological intention threaten to derail our progress before it ever gets started.
Therefore, for clarity’s sake, let us establish that a “LABEL” is a point-in-time reference to a state of the schema, compounded of all the checked-in changes at that point in time.
Once a change has been compiled on the database, which can be a newly created or altered object, that change becomes part of the “LIVE” settings.
This setting refers to any change that is present on the database and has been compiled. It acts as a distinction for DML commands on tables that have their “Content Management” enabled.
After the change is checked in, or the new object is added, that change creates a new “REVISION” for the object.
Each revision is saved in the repository and it is possible to view the revision history of an object. You can also select any two revisions and compare the changes between them, or select a single revision and compare it to the live version.
Database Development Protocol Demo
Applying a “LABEL” on a database will create a point-in-time reference to the latest checked-in revision for all the objects, making it easier to track database changes and execute database development protocol.

Let’s take the following example:
- Create table Table1 (I number);
- Add Table1 to source control
- Create table Table2 (I number);
- Apply Label1
- Add Table2 to source control
- Apply Label2
- Check out Table 1
- Alter Table1 add (J number);
- Check in Table1;
- Check out Table 1
- Alter Table1 add (K number);
- Apply Label3.
Live includes: Table1 (I number, J number, K number) and Table2 (I number). This is because those are the changes that have been compiled to the database.
Label1 includes: Table1 (I number). This is due to the fact that even though Table2 existed, it wasn’t part of the source control.
Label2 includes: Table1 (I number) and table2 (I number).
Label3 includes: Table1 (I number, J number) and Table2 (I number). Since the new column K wasn’t checked in, it wasn’t included in the label.
The latest revision for the database will include: Table1 (I number, J number) and Table2 (I number). This is the last checked-in revision for each object.
Label Entities as a Baseline for Database Development Protocol
The baseline entity came to resolve a very problematic issue with the 2-way compare. In most cases, comparing the source and target will highlight differences. However, it also does not know whether the change happened on the source or on the target, which usually results in the source overriding the target. For this reason, it is imperative to know where the change occurred in order for it to be preserved.
This is where the baseline comes into play, evolving the 2-way compare to a 3-way compare. This ensures that the change detection not only works between the source and the target, but also to a 3rd schema, which serves as an “anchor” for both the source and target. This 3rd schema is a “label,” depicted as the baseline for the impact analysis.
This baseline allows you to identify the differences between the source and the target, and where the changes actually occurred. It also is able to identify the cases of a configuration drift and conflict when the same object was changed both on the source and the target.
A baseline can be any label entity, but the label will usually be chosen from the target. In many cases, a 3rd schema can be set up as a static point to a version upload, and the label on that 3rd schema can be used as well. This is a very common setup when the target isn’t managed.
Label Entities as Baseline Demo
- We start with both Prod and Dev on Version 1

- The development team developed version 2 on Dev, while also uploading hotfixes to Prod.

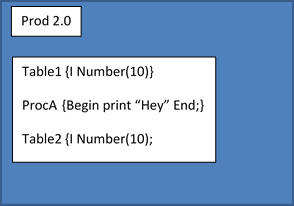
If we were to deploy version 2.0 from dev to prod without a baseline, the following changes would have been performed:
- Alter ProcA, overriding the change done on ProcA in PROD.
- Create Table2 as a new table.
- Drop Table3, as it does not exist in the source.
- Prod would end up as follows:

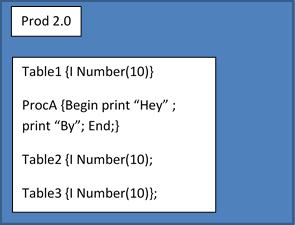
- Create Table2. Table2 appears in the source, but not in the target or baseline. This is an indication that it’s a new object that needs to be added to the target.
- Do nothing with Table3. Table3 appears in the target, but not in the source or baseline. This is an indication that the object was added on the target only and the change needs to be preserved.
- Create a conflict alert on ProcA. ProcA was changed, both on the source and on the target. Using the baseline, we know that and display the three versions, allowing the DevOps to decide which version to take. In this case we will merge the changes.
- Thus, Prod would end up as follows:

Conclusion
Managing database development protocol is no easy task. There are many moving parts from object management to change cataloguing and version retrieval. This step-by-step guide was devised to help make these difficult tasks a little more regimented and transparent.
The goal should be to understand exactly what needs doing and to have a protocol in place for how to do it. The execution might not always be pleasant but at very least it should be well-structured. With this, you should be able to get your database automation under way quickly and correctly.


